
This blog post provides a comprehensive guide on how to repair a faulty electric oven. It covers safety precautions, problem identification, and step-by-step solutions for issues like no heating, lack of temperature control, and a faulty oven light. The post emphasizes the importance of safety and offers the option of professional repairs if needed.
Ensuring Safety Before Oven Repair
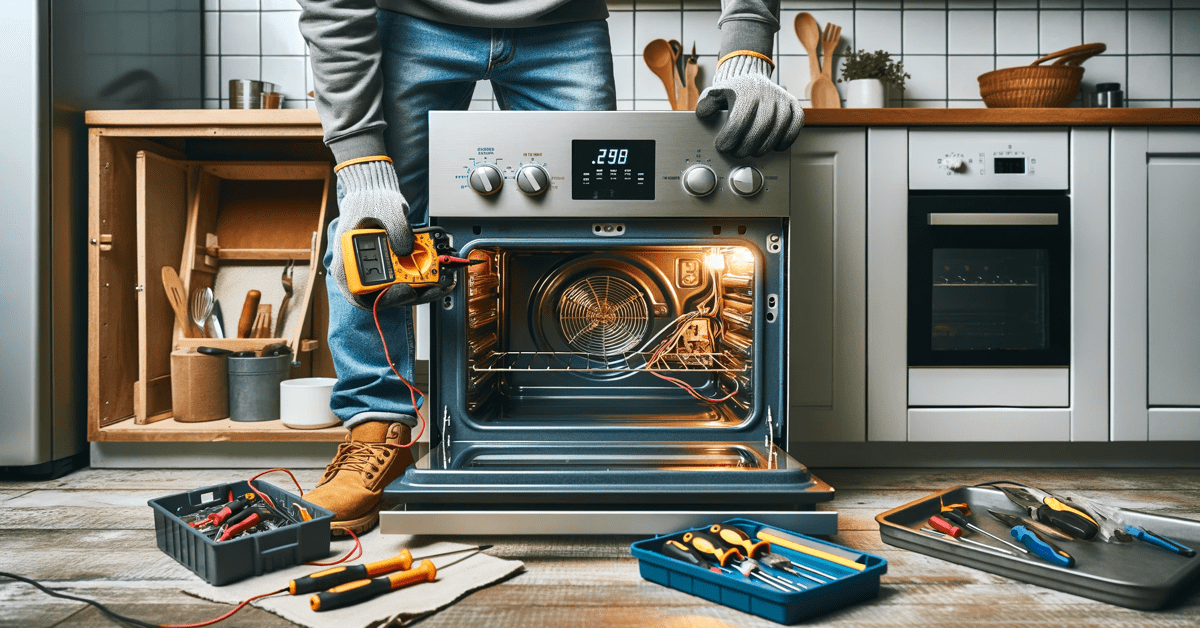
Engage the appropriate circuit breaker to fully disconnect power, safeguarding against electrical hazards. This act is non-negotiable; treat it as a prelude to any repair task within the electrical realm of your home.
Before proceeding, verify the absence of electrical current with a voltage tester—a crucial step to eliminate any lingering doubt

about electrical safety. Never bypass this step, as it is the bedrock of a secure repair environment, nullifying the risk of electric shock.
Upon ascertaining a neutralized electrical environment, only then consider proceeding with diagnostics or reparative actions. This disciplined approach ensures that safety is paramount in your repair journey.
Disconnecting Power Supply
Ensuring the oven is completely free from any electrical power is a crucial initial step in safeguarding your safety. This is the cornerstone of any repair procedure involving your electric oven.
To fully neutralize any electrical threat, disconnect the appliance by unplugging or by switching off the circuit breaker. Taking these measures functions as a failsafe against any unintended electric current during maintenance.
An uninterrupted electric oven can consume more energy than a refrigerator running for a full day.
After properly disconnecting the power supply to the oven and before commencing with diagnostics or repairs, confirm the absence of electrical current using a voltage tester. This is a pivotal safety verification to prevent electric shock and is integral to a secure repair process.
Protective Gear and Precautions
Prioritizing safety is essential when undertaking electric oven repairs, as the risks are significant.
- Disconnect the oven from the power supply by unplugging it or switching off the circuit breaker.
- Wear insulated gloves to create a barrier against electrical currents.
- Use a voltage tester to confirm there is no current flowing before beginning repairs.
- Keep a fire extinguisher nearby, especially one suitable for electrical fires, as a precautionary measure.
Electrocution and fire hazards are real concerns, so never overlook the importance of protective gear.
An electric oven can contain residual energy even after disconnection; always handle it with caution and respect for the potential dangers.
Troubleshooting Common Oven Issues
As you confront the intricacies of electric oven malfunctions, begin with a methodical approach to troubleshooting common issues. A symptom-driven diagnosis can quickly narrow down potential causes. For example, an oven that fails to heat may signal a defective bake or broil element, while uneven cooking could implicate a malfunctioning convection fan or a misaligned temperature sensor. Fluctuations in power, manifesting as irregular oven operation, often hint at deeper electrical disturbances. Each issue has its set of unique solutions, molded by the specific conditions and components at play.
Oven Fails to Heat
When an electric oven fails to produce warmth, the failure usually stems from one of a few components. A thorough inspection can lead to the identification of a faulty heating element or a disruption in the power supply.
Inspect the heating elements for visible damage such as blistering or breaks. Its continuity can be tested using a multimeter.
Another culprit may be the oven’s internal fuse. If blown, it requires replacement before the oven can function again.
It’s also advisable to scrutinize the oven’s thermostat. An inaccurate thermostat won’t signal the elements to heat. Check for calibration or replace if defective.
Occasionally, a malfunctioning control board disrupts the electric supply to the heating elements. Such intricate issues generally necessitate professional intervention.
Ultimately, an oven’s failure to heat is a complex problem. Meticulous troubleshooting, alongside vigilance for electrical safety, paves the way to a solution.
Inconsistent Oven Temperatures
Inconsistent oven temperatures can be a perplexing issue for many homeowners. The initial step in addressing this problem is to verify the oven’s calibration.
A thermostat out of calibration can lead to unpredictable cooking results. An oven thermometer is an invaluable tool when gauging the accuracy of your appliance’s internal temperature gauges.
Ensuring the proper function of the temperature sensors is crucial. It’s advisable to check these components for any signs of damage or misplacement, which could affect their readings.

Insight into Troubleshooting Oven Problems
One must also consider the potential impact of the oven’s door seal integrity. Any gap or deterioration in the seal can cause heat to escape, resulting in inconsistent temperatures.
If the aforementioned fixes do not rectify the issue, it may be indicative of a more intrinsic mechanical failure. In such cases, seeking professional expertise is firmly recommended.
Step-by-Step Repair Instructions
To venture into repairing an electric oven that exhibits no heating, commence with an inspection of the bake and broil elements. These elements should manifest an even red glow when activated. Should the elements not heat, use a multimeter to confirm continuity, indicating whether a replacement is necessary. Always ensure your safety by disconnecting the power before proceeding with the removal and replacement of any components.
Addressing a malfunctioning oven light begins with replacing the bulb, ensuring it matches the manufacturer’s specifications. Should this not resolve the issue, further investigation into the light socket and connections is required. With the oven disconnected from power, probe the socket with a multimeter for electrical continuity. If the socket is defective, carefully replace it. For more complex issues involving wiring or control systems, engaging a qualified technician is the most prudent course of action.
Replacing the Heating Element
Begin by ensuring the power is disconnected.
The heating element is the workhorse of your electric oven. To ascertain the integrity of this component, one must engage in a careful examination for signs of damage, such as blistering or breaches in the element itself. Replace it immediately if you observe such anomalies to ensure optimal oven function.
Disconnect the element from the wiring.
With the element exposed, remove the mounting screws. These screws secure the element to the oven cavity – usually at the back. After the screws are removed, gently pull the element forward to reveal the wire connectors.
Acquire a matching element for installation. When procuring a replacement, make certain to select an element that matches the oven’s specifications, affirmed by consulting the user manual or manufacturer’s details. Employ the reverse procedure to install the new element, ensuring a snug and secure electrical connection and reassembly of the oven cavity.
Checking and Replacing Thermostat
When the oven fails to regulate temperature accurately, suspect the thermostat.
First, ensure the oven is disconnected from power.
The thermostat is crucial for oven temperature control, sensing and maintaining the set heat level. Carefully remove the thermostat from its position, ensuring not to disturb the capillary tube which is sensitive to any bending or damage.
A multimeter can help ascertain the thermostat’s functionality. Set the multimeter to the lowest ohms of resistance, connect the probes to the thermostat’s terminals, and watch for a change in the meter’s reading as you adjust the temperature knob.
Purchasing a new thermostat requires accuracy; match the part number with the manufacturer’s specifications. To replace the failed component, follow the removal process in reverse, making sure to securely reattach the wiring connectors and correctly position the capillary tube to reflect the oven’s internal temperature. If you are unsure about any step, it’s better to seek the help of a skilled technician to avoid any inadvertent complications.
Addressing Oven Light Malfunctions
When faced with a non-functioning oven light, first ensure that the power is completely disconnected to avoid electric shock. A simple bulb replacement can often rectify the issue; it’s crucial to use an oven-rated bulb that can withstand high temperatures. If the problem persists, the malfunction may lie within the light socket, the switch, or the wiring. These components require a careful inspection as they are connected to the oven’s electrical system. For intricate electrical issues, it is advisable to seek the assistance of a professional appliance repair technician to ensure a safe and accurate resolution.
Changing the Light Bulb
Before replacing a faulty oven light bulb, it is important to disconnect the power supply to ensure safety. Make sure that you choose a replacement bulb that meets the high heat resistance specifications given by the oven manufacturer.
If the bulb still does not function after replacement, check the bulb socket for any damage or corrosion. Use a non-conductive cleaning agent to clean the socket, making sure not to damage any electrical contacts.

Illuminating Solutions for Oven Light Problems
If the new bulb still fails to illuminate, it may indicate a deeper issue with the oven’s electrical system, such as a defective switch or faulty wiring. These problems can pose a significant risk and require attention from a professional technician, especially if your troubleshooting does not restore light functionality.
Inspecting Light Mechanisms
Upon identifying a malfunctioning oven light, first inspect the socket for any visible signs of damage or debris. This is crucial as such imperfections can cause connectivity issues, inhibiting the bulb’s performance.
Ensure the bulb contacts are aligned properly within the socket. Misalignment can prevent electrical contact and impede the light’s operation.
Next, verify the integrity of the socket’s wiring, carefully examining for any signs of wear or damage. Issues such as frayed wires or loose connections can disrupt the electrical flow, preventing the bulb from lighting up efficiently.
Continual problems with the oven light, despite bulb and socket inspections, could indicate a failing electronic control board or switch. It is recommended to have a professional inspect such components for potential faults. Their intricate nature requires a meticulous approach to avoid unnecessary risks and ensure a long-lasting repair.
Key Points:
- Safety Precautions:
- Unplug the oven and turn off the circuit breaker.
- Wear insulated gloves and avoid flammable substances.
- Identifying Problems:
- Look for signs like no heating, lack of temperature control, and a faulty oven light.
- Fixing Common Issues:
- Check the fuse and circuit breaker for heating problems.
- Ensure the thermostat is not touching a heating element for temperature control issues.
- Try replacing the light bulb with a faulty oven light.
- Consider Professional Assistance:
- Contact a professional technician if unsure or uncomfortable with the repair process.
What are the safety precautions to take before repairing an electric oven?
Before starting the repair process, it is important to unplug the oven, turn off the circuit breaker, wear insulated gloves, and avoid using flammable substances near the oven.
How can I identify potential problems with my electric oven?
Common signs of problems include no heating, lack of temperature control, and a faulty oven light.